Over the last year, I got very interested in night photography. I’ve been practicing when I can – when the sky is clear, when other conditions are right, and when I have time.
At this time of year, photographing the Milky Way is not particularly rewarding, as the brightest parts of the Milky Way are below the horizon. However, winter is a good time to photograph the night sky, as cold, dry air gives the clearest view. Thus, I’ve been practicing taking star trails photos.
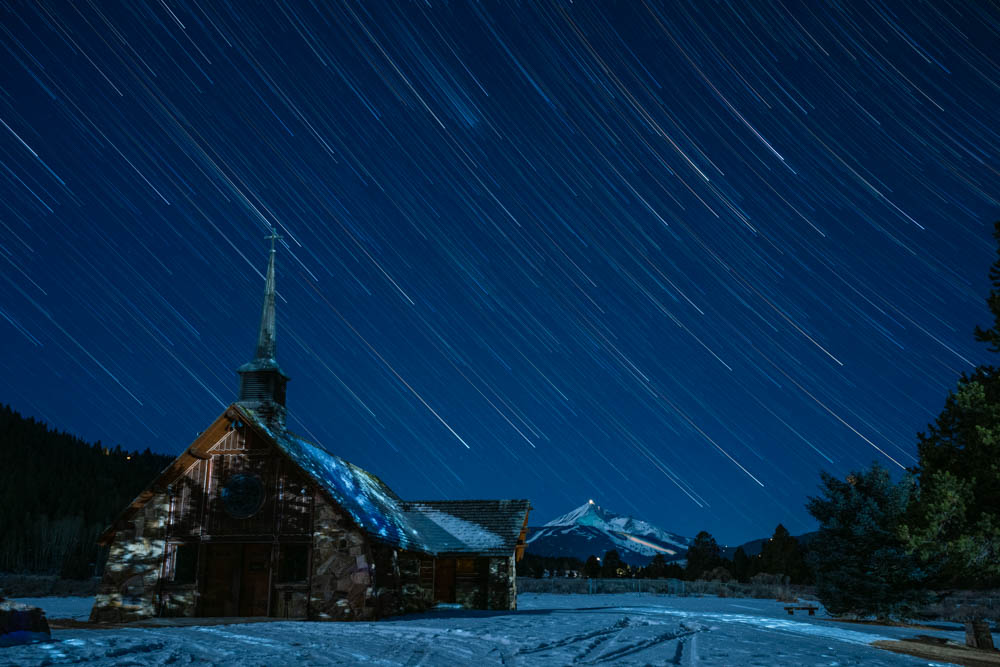
“Star trails” refers to photos that show the stars as long, curving trails in the sky, such as the photo below.

This is my latest attempt, and although I still feel like I have a lot of room for improvement, I think this was reasonably successful. I’d like to share what I’ve learned here.
Camera settings
Most people look at a photo like this and assume that it’s a single very long exposure. This is not actually the case. It takes at least an hour to get trails this long, but a one-hour-long exposure would never work. This image was made by stacking multiple photos. (More on exactly what “stacking” means shortly.)
I got to the site around 3:40 am and got set up. This photo is facing west, and there was a waning gibbous moon helping to light up the foreground. There was also a nearby gas station with bright lights shining into the scene through the trees.
I used the widest focal length on my lens – 24mm – and set the aperture to f/4.5. (The lens actually opens to f/4, but I didn’t need to have it fully wide open for this.) I set my camera to ISO 320 and used a 25 second exposure. The relatively low ISO helps the photos be less noisy and show more color in the stars, and is made possible by the extra light on the foreground and the length of the exposure. You’ll need to play with this with your setup under a variety of conditions to find the settings that work best for you.
I also set the white balance to 3400K. This works well for me for these conditions, but everyone’s preference for color with night sky photos is different, so experiment. Also, do not turn on long exposure noise reduction (as it’s called on Nikon cameras)! This will result in taking a dark exposure after every regular exposure, so that the camera can automatically remove any “hot pixels” causing noise. However, this means your star trails will turn into dotted lines, due to missing every other shot.
Lining up the shot
Once the settings are right, I got my camera mounted on the tripod and set up my shot. Unfortunately, in the dark it’s very difficult to see some subjects within the viewfinder or on the screen, like the mountain or the trees in the photo above. So I took several test shots, and looked at the result on the view screen, moving the tripod and recomposing the shot until I got one that I was happy with.
I also got my focus set while shooting test shots. I wanted to make sure that both the chapel and the stars were in focus. (For star trails, it’s less important for the stars to be perfectly sharp, but you at least want them close.) This required me to think about hyperfocal distance – ie, the distance at which I could focus my lens and have everything from half that distance to infinity be in focus.
This is a complex subject too large for discussion here, but suffice to say that I took hyperfocal distance into account both when positioning my tripod and when focusing to ensure sharpness in the subjects I cared about. After focusing, I took a test shot and zoomed on the view screen. On my Nikon camera, double-tapping the screen zooms to 1:1 so I can see whether things are focused or not. Zooming past 1:1 makes things look blurry due to pixelation, so don’t zoom past that point when reviewing sharpness.
Once the focus was correct, I made sure the lens was set to manual focus to ensure it didn’t change. (You should be able to change a setting to manual focus in your camera as well, if your lens doesn’t have a physical A/M control.)
One last hint I’ll give you for hyperfocal distance: the PhotoPills app for smartphones is almost a required purchase for serious photographers, and has an excellent hyperfocal table you can refer to.
Shooting the photos
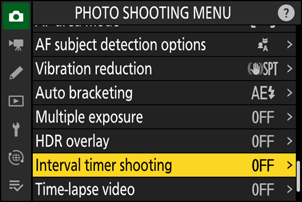
At this point, I was ready for shooting. I used the interval timer shooting function to take the photos. This lets you take some number of photos, shooting one every N seconds, where you specify the value of N. For example, you can shoot 10 photos, taking one every 5 seconds.

The shutter speed is completely independent of the interval. In the example above, you could shoot a photo at 1/250 of a second every five seconds. You might want to do something along these lines if you’re trying to create a time lapse movie, for example. For star trails, though, you want the shutter speed to match the interval, as closely as possible… 25 seconds in this case.
However, this can be tricky. A 25 second exposure is actually not exactly 25 seconds. For this reason, if you set the interval to be 25 seconds, you’ll miss every other shot, again resulting in dotted lines. You’ll waste an hour or more of your time getting photos you can’t use.
I’ve done some experimentation with my own camera, and I’ve found that a 27 second interval gives me what I need. 26 seconds skips some frames. For a 30 second exposure, I’ve found an interval of 32 seconds isn’t enough, it needs to be 33 seconds.
For the above photo, I wanted a shutter speed of 25 seconds, thus an interval of 27 seconds. I wanted to photograph for about an hour, to get the length of star trails I wanted. A little math told me I needed around 133 frames, one every 27 seconds, to get one hour of photos. I rounded up to 140 to make things easier.
I set the interval timer shooting with those settings and started it going. Then sat back and waited for an hour.
Once interval shooting was complete, I did something that will sound weird, but just bear with me; I put the lens cap on and shot one more photo without changing anything else.
Stacking the photos
Once shooting was complete and I was back home, I loaded up the 140 images in Adobe Lightroom. I used Develop mode to adjust the first photo – mostly some exposure-related changes to make the image look good and some vibrance adjustments to bring out the color in the stars. Then I synced those adjustments to the other 139 images. Since the entire time I was shooting it was true night, and the moon was in the sky the entire time, the light in the scene was not changing. In such a case, the same adjustments would apply equally to all images.
Side note: If you can really nail the exposure in the camera, you can avoid most exposure adjustments, but that can be difficult in the field looking at an image on the view screen in the dark. It’s hard to judge the aesthetics of the image under such conditions. I shoot RAW so that I can get the exposure close and then adjust further in Lightroom without degrading the image.
Once all the images are adjusted, I’m ready to start “stacking.” What this means is that I use some process to combine all the images into one single image. There are a number of different ways to stack images for star trails. As a Mac user, I use the free StarStaX software for macOS. If you don’t use a Mac, there are other options, but I’m not familiar with them. I know it’s possible with Photoshop, but have never done it.
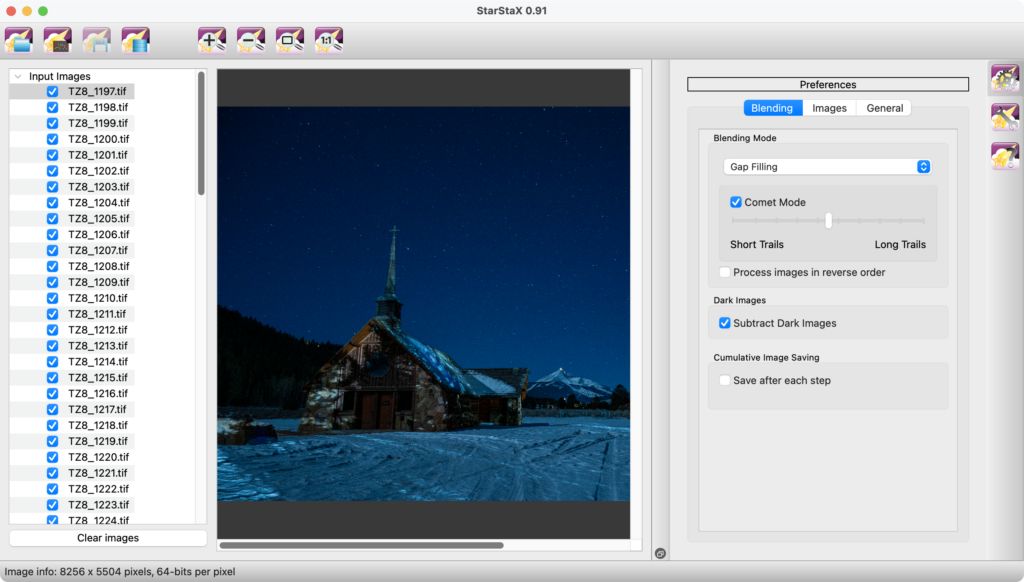
For StarStaX, I start by exporting all 140 images as uncompressed TIFF into a folder. Once that export is done, I can load those images into StarStaX.

StarStaX also has the capability to load what it calls “dark frames.” This is that last image I took with the lens cap on. What this does is identify “hot pixels” on the sensor. After a lengthy photo session, the sensor heats up, and that heat causes noise in the images. Often, certain pixels in the sensor will be really “hot,” resulting in a light-colored pixel even though the lens cap was on and no light was getting through the lens.
Load this “dark frame” into StarStaX to enable it to compensate for those noisy pixels in the finished image.
Once all your images are loaded, set your preferences. I like to use “Gap Filling” as the blending mode, which helps smooth out the trails, and find turning on “Comet Mode” makes them look less like simple curved lines in the sky and more like something moving. But feel free to experiment and see what you like best!
Finally, start processing. This will take some time, but the final result will be an image that you can save to disk. The one flaw in this process is that it saves as a JPEG, so you won’t want to edit any further at this point. This is why I do all my edits up front, before exporting the images.
What next?
You can play around with this to fit your own tastes. Maybe you’d like shorter trails? Shoot for less time. Longer trails? Go longer. (Be aware, though, the longer you shoot, the more likely you are to run into battery issues, or in the winter, frost on the lens.)
Try photos with a full moon, a partial moon, or no moon. With no moon, your foreground will be very dark, but you could try lighting it through techniques like light painting or use of low-level lighting. (Not in national parks like Yellowstone or Arches, though! Check the rules if you’re shooting in a park to see what’s allowed.)
The biggest challenge is finding interesting foreground elements. A photo with just stars over a relatively uninteresting horizon is quite boring. As you’re exploring and photographing during the day, keep your eye out for subjects that might work as a foreground element for a night sky photo.
Most of all, experiment and have fun!
My spouse and I stumbled over here coming from a different
web page and thought I might check things
out. I like what I see so now i’m following you. Look forward
to checking out your web page yet again.