I love photographing the Milky Way, but images captured in the winter (in the northern hemisphere) are generally less appealing, as the most interesting part – the core – of the Milky Way does not rise above the horizon. Now that we’re back into “Milky Way season,” though, it’s a perfect time to talk about how to photograph it!
There are four different techniques that I’m aware of:
- Single-shot
- Stacking multiple shots
- Stitching multiple shots in a panorama
- Using a star tracker
Of these, I don’t yet have any practical experience with the last two, but we can still talk pros & cons. Before we do, however, we’ve got to talk about some of the problems you’ll need to account for.
Challenges with shooting “spot stars”
When shooting the night sky, obviously light is going to be one of the big problems… it’s dark! The obvious solution to low light situations is to use a longer exposure, but because Earth is spinning pretty fast, it doesn’t take a particularly long exposure to make the stars elongate into streaks. That can make for pretty neat photos (see Star Trails), but when you’re shooting the Milky Way, that’s not desired.
For the Milky Way, you want the stars to be as close to dots as possible, rather than dashes. Unless you’re using a star tracker, that means using a faster shutter speed than you would otherwise want, which also means raising the ISO, which means more noise.
Second, there are things in the night sky other than stars. Capturing a shooting star can be pretty cool, but there are also less desirable objects: airplanes, satellites, etc. Even if these objects do not have lights on them, they are in space and can reflect light from the sun down into your lens. The moon itself can also pose problems.
Ideally, you want to capture an image with as little noise as possible and without unwanted bright objects getting in the way.
Basic principles
In general, you’re going to want to shoot with the widest possible lens. A wider lens allows you to use a longer shutter speed without causing “elongation” of the stars, and a longer shutter speed means a lower ISO and less noise. If you’re using a camera with a crop sensor, keep in mind that your lens is effectively 1.5x longer on that camera body, and you’ll need to account for that.
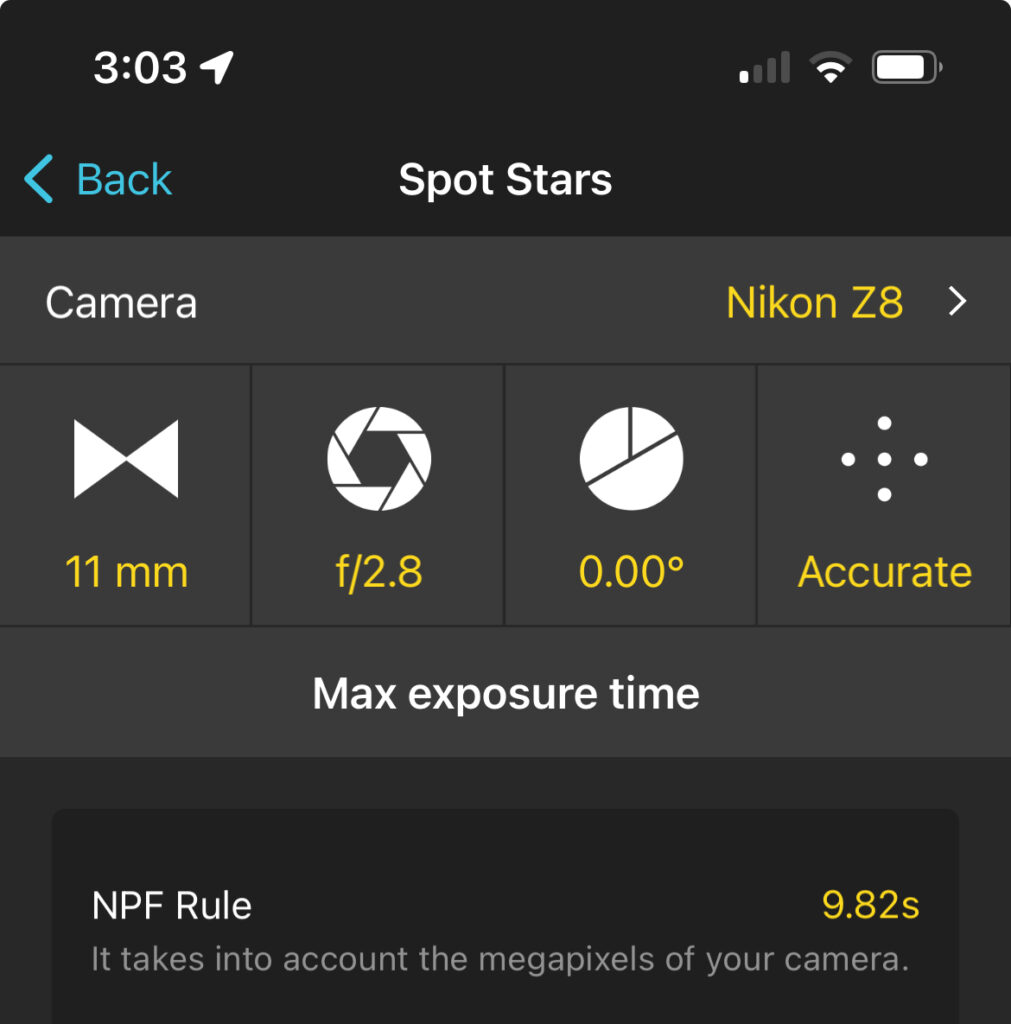
To determine the best shutter speed, I like to use the PhotoPills app on my phone to get a starting point. It has a Spot Stars calculator, where you can enter your camera information, lens length, and f-stop, and it will tell you what the maximum speed is that you can shoot. You can also play around with this, shooting test shots with different exposures to see what you can get away with.
You also need to choose an ISO, and there’s no hard and fast rule for that. You’ll need to take a few test shots with different ISOs and see what you get, as the results will differ for every camera. In general, faster shutter speed will give you more perfect spot stars, but will mean you need a higher ISO, which means more noise. A slower shutter speed will let you reduce ISO – and noise – and will also give you more color in the sky, but might cause the stars to elongate.
Focus can also be an issue. You’re going to want to put your focus at a point where both the stars and any foreground elements are in focus. Consulting a hyperfocal table (such as the one in PhotoPills) can help you determine where you can focus to ensure best focus.
If you don’t know how to use a hyperfocal table, it basically tells you at what distance to focus to ensure that everything from infinity to half the hyperfocal distance is in focus. For example, if the hyperfocal distance for a particular lens/camera/f-stop combination is 10 feet, that means focusing the lens at 10 feet will ensure everything from 5 feet in front of the camera to infinity should be in acceptable focus. This is easier said than done, though, in the dark, so test shots are crucial.
Whatever settings you choose, always be sure to take a test shot, then zoom in on the camera screen and make sure you’re happy with the results. If not, adjust and try again. Also, keep in mind that you can brighten up the image in something like Lightroom later, as long as you haven’t made the image so dark that there’s very little to brighten. If most of the image has gone to 100% black, there’s no recovering from that.
Finally, be sure that you are shooting in raw, not JPEG. Raw images generally need more editing than a JPEG, which may look nice right out of the camera. However, JPEGs cannot be edited non-destructively – every change you make reduces the quality of the image – while raw files can. Also, the camera will make a lot of choices for you when capturing a JPEG, and you’ll probably want to make different choices yourself in your digital darkroom later.
Composing the shot
A big part of a successful night photo shoot is good planning. You need to know during what times the Milky Way will be visible, where it will be, how it will be oriented, and where the moon will be and what phase it will be in. You can use PhotoPills to help with this planning. Its Night AR feature is great for planning when you’re on site during the daytime and want to see where the Milky Way will be at some later time or date. You can also use Stellarium to do your research from the comfort of your home on the larger screen of your computer.

In general, the Milky Way will be somewhere to the south, and it tends to migrate from southeast to southwest from spring to fall. Early summer is the best time to capture the Milky Way as a rainbow-like arch.
The moon is particularly critical. A sliver of moon can illuminate your foreground for a more pleasing photo. However, the closer to full the moon gets, the more it will wash out the sky, drowning out the dimmer stars. (Note that, in the Stellarium screenshot above, it simulates the washed-out look to the sky due to the presence of a near-full moon.)
I like a full, or nearly full, moon for star trails, because it lights up the foreground nicely and washes out dim stars so the sky isn’t just a busy mess of star trails. However, when photographing the Milky Way, you want as much detail as possible, and a full moon just isn’t compatible.
You also have to pay attention to the position of the moon. If the moon is going to photobomb the Milky Way, it’ll ruin your shots and you’ll have stayed up late for nothing. It doesn’t even have to be in the frame; it can cause lens flare if it’s shining on your lens, even if the moon itself is not visible in the shot. In the Stellarium image above, I probably wouldn’t even consider shooting on that night.
Finally, a critical piece that will determine the success of your photo is the foreground. A photo of just the Milky Way can be nice, but a rather dull foreground can ruin it. The best photos have the Milky Way over an interesting foreground element. This could be a mountain, a building, a cool rock formation, a river or lake, etc.
That foreground element could simply be included as a silhouette, if the shape is interesting, or it could be lit by the moon, artificial lighting, or even just by starlight. Be aware that you’ll probably have a lot of noise in the foreground, depending on how you take the photos. One technique is to take a photo of the foreground earlier in the evening when the light is better, then splice that into the final image with something like Photoshop. I haven’t mastered this technique yet, so my foregrounds are not always perfect.
Reflections can be quite spectacular with Milky Way photos, if you can find something like a very calm body of water that will mirror the sky for you.
It can be hard to see your foreground in the dark, so it can be a good idea to arrive at the site while there’s still light. This lets you get your camera set up on the tripod early, line up the shot, dial in the focus, and then wait for dark.
Sometimes, though, that’s not an option. If you have to set up in the dark, make sure to take plenty of test shots with longer shutter speeds so you can clearly see the foreground. You may blow out the sky, but that’s okay for test shots that are destined for the digital dumpster. If you don’t like the composition in your test shots, move the camera or the entire tripod and try again until you get what you want.
Single shot photos
Taking a single shot of the night sky is obviously the easiest technique, as it takes less time and less work (on the surface) than other techniques. You can get some nice results this way, so it shouldn’t be discounted completely.
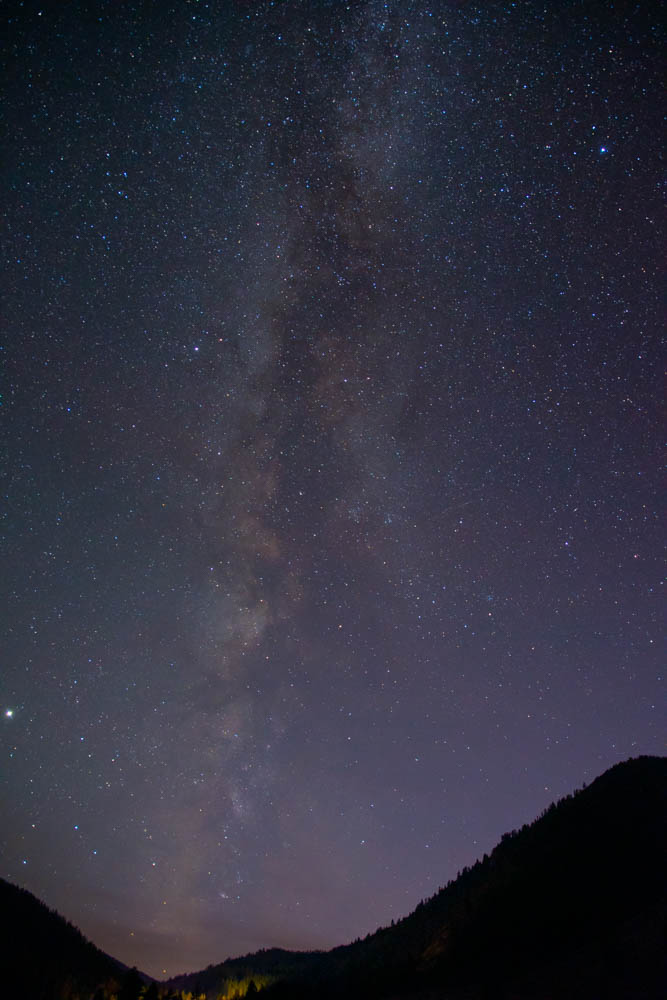
The above shot was taken with a 24mm lens (a 16mm lens on a crop sensor camera), with an exposure of ISO 800, f2.8, and 15 seconds. This exposure minimized noise, but if you zoom in on the full image, you can see the stars are little dashes. The image also was quite dark, requiring a lot of brightening in post, which means colors were more muted.
With single shots, noise can be bad, and streaks manmade objects will almost always be present in your photo. In the full-resolution version of the image above, there’s one satellite streak, though it’s faint.
There are some things you can do about this. There are a number of software post-processing tools you can use to reduce noise in a photo, and they can have some success, as in the above photo. There are also tools that can remove the manmade objects from the sky. I don’t have experience most of them, and in the past just used Lightroom’s Sharpening and Healing tools, with decent results. However, keep in mind that you’ll lose some of the stars with any noise reduction, as well as with removal of manmade objects.
Stacking multiple shots
“Stacking” refers to taking multiple photos of the same thing, without moving the camera, and then combining them. There are a variety of reasons and methods for stacking, but in this case, the goal is to bring out more color and eliminate noise and other transient pixels from your image.
To give you an idea of what kind of impact this has on a photo, compare the following images:
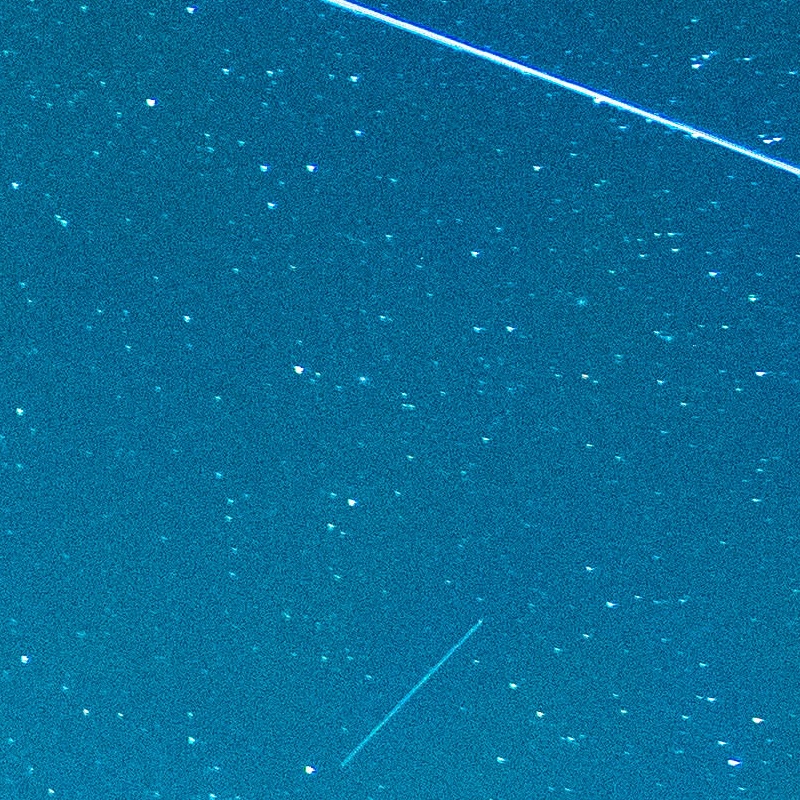
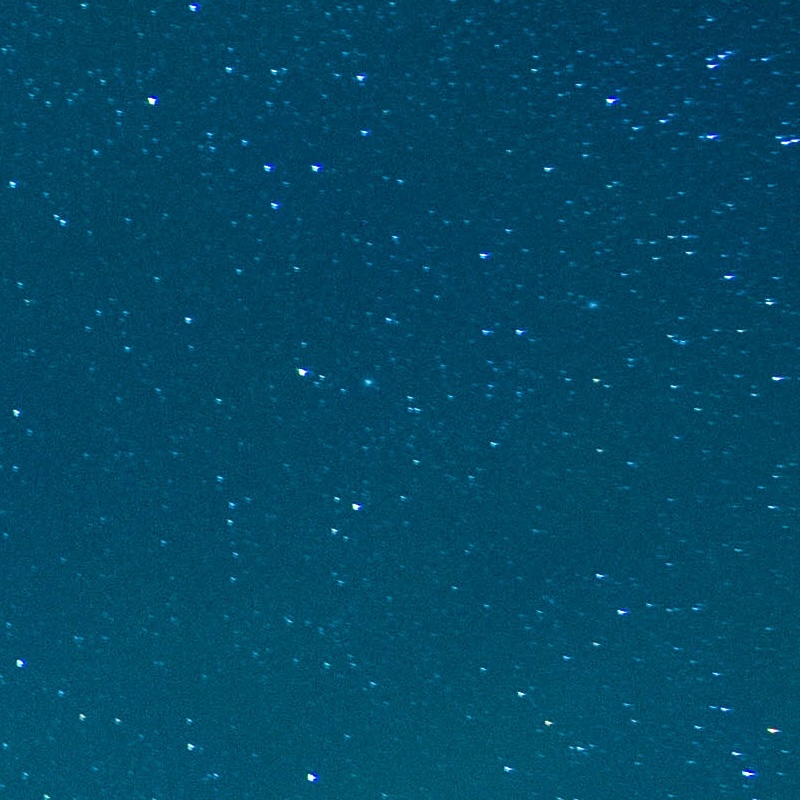
These images are just a zoomed-in portion of two different images. The one on the left is one of the single images used for stacking, while the one on the right is the result of stacking 16 images.
As you can see, the single photo has much more visible noise, and it’s also got a couple obnoxiously-bright streaks in the image. The one at the bottom was a satellite, while the one in the upper right was actually a Starlink satellite launch that intruded rudely on my shooting. (That was a wild thing to see, with at least ten equally-spaced lights moving in a perfectly straight line across the sky. I had no idea what I was looking at until later!)
Stacking multiple images results in reduced noise and elimination of manmade objects. I don’t fully understand how it works, but the basic idea is that any pixels that are significantly different in a particular photo are ignored.
The above image was stacked from 16 source images. Each image was taken with an exposure of ISO 6400, f2.8, and 15 seconds, with a 16mm lens (11mm on a crop sensor camera). Again, the stars aren’t quite points, but it would be hard to tell without zooming all the way in. The longer exposure and higher ISO let me capture more color, at the cost of more noise, but the stacking reduced noise in the final image significantly.
I also set the white balance to 3400k. There’s no particular rule here, and you can edit the “temperature” of the image in post, but it never hurts to start from a good setting. In this case, 3400k is just my preference. Since the human eye is not capable of seeing the full color of the Milky Way, given the dimness of the light, this is something that you can set as you like. Choose whatever setting looks best to your eye, and nobody can really argue that it’s wrong unless you take it to a garish extreme.
I used the intervalometer in my camera to take the photos for me. I set it to take 16 images with an interval of 18 seconds. The way this works on most cameras is that the shutter is opened at the beginning of each interval, with whatever shutter speed you have set in the camera. However, you need a little extra time between shots, because of time needed to finish processing the image and discrepancies between a “15 second” shutter speed and how long the shutter is actually open.
If you don’t add enough extra time, the result is that your camera will skip taking a picture every other interval, resulting in half the images with gaps between. You’ll need to test with your camera and see how much extra time you need to tack on. This is less critical for Milky Way photos than for star trails, where any gaps between photos means you can get dotted lines instead of trails, but you still want to capture the correct number of images. (You can find more discussion on this in my Star Trails post.)
Back at home, I use Starry Landscape Stacker to stack the images. (It’s available on the Mac App Store, if you have a Mac. There are other options if you have a Windows machine, but I don’t know what they are.) It will first need to “find the sky,” and may need your help to do so. (You just use a brush to paint either the sky or the ground in any areas the app gets wrong, it’s quite easy. See the photo below, where some areas at the top edge need painting to mark as sky.) Next, click Align and Composite to stack the images, aligning the stars and combining images to produce a lower-noise image with greatly clarified colors.

Although this is more work, both in the field and back in front of the computer, I’m much happier with the results of stacking than with single shot images.
Stitching multiple shots
Stitching is both similar to and very different from stacking. Both involve combining multiple images into one, but stitching involves combining images into more of a panorama. In other words, the images have some overlap, but each successive image actually adds more width or height to the final image.
I do not have practical experience with stitching night photos, but the basic idea is to take photos using the single shot method. Between each shot, rotate the camera to one side or the other, with about 50% overlap with the image captured in the previous photo. You can also tilt the camera up and then take another row of photos for additional height.
The main purpose of stitching is to get an image that has many more pixels than your camera’s sensor can capture in a single image. The result would be a very large image, with the advantage of being able to be printed at very large sizes.
As an example, let’s say that your camera’s sensor is 5000×3000 pixels (to keep the numbers simple. If you capture 3 rows of 10 photos, overlapping by 50%, then your final stitched image could be 27,500×6000 pixels (if my math is correct)!
Of course, a stitched image can also be very dramatic, even if you’re not planning to print it, as it can capture more than a single shot with your widest lens.
Using a star tracker
I know the least about this, but have seen some very nice photos taken this way. I mention this only for completeness, so that you know this option exists.
A star tracker is a hardware device that can keep your camera pointed at a fixed point in the sky, moving it constantly to account for the Earth’s rotation. It offers the advantage of allowing you to use a long exposure and low ISO, to get great color and less noise – without worrying about turning the stars into lines.
However, the problem is that any foreground elements will be blurred by the moving camera. I believe that the solution to this is to take a foreground photo first, then take another photo with the tracking turned on, and combine the foreground from one and the sky from the other.
Final images
Whatever technique you use, the result will very likely not be entirely beautiful yet. Don’t be discouraged if the image looks a bit blah, as the final step is to enhance the images in post. Ideally you’ll be working with either a raw file or – if you stacked or stitched images – a TIFF, either of which can be edited non-destructively.
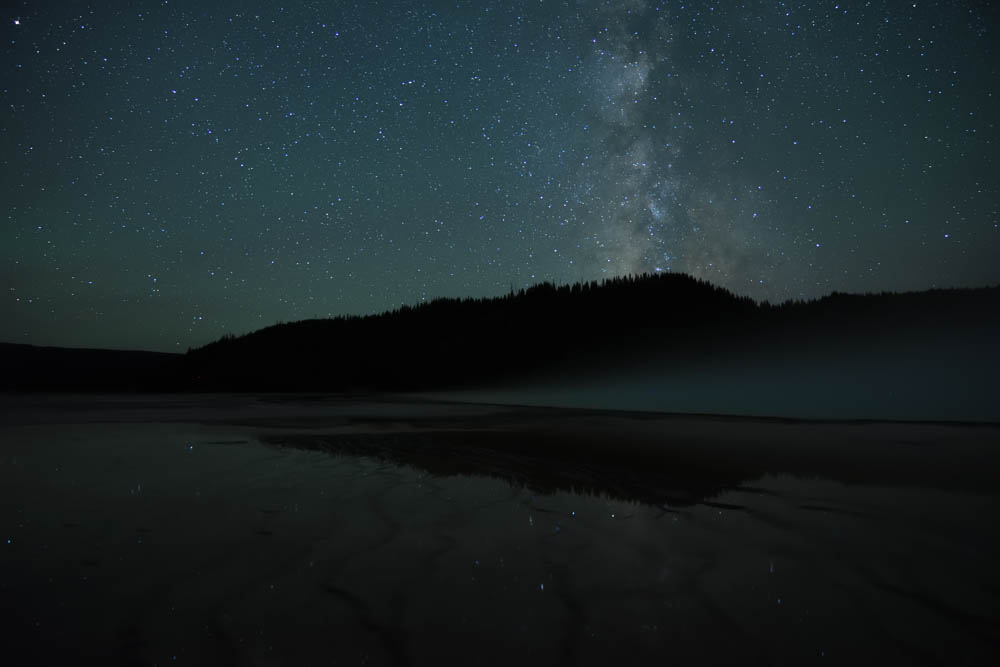
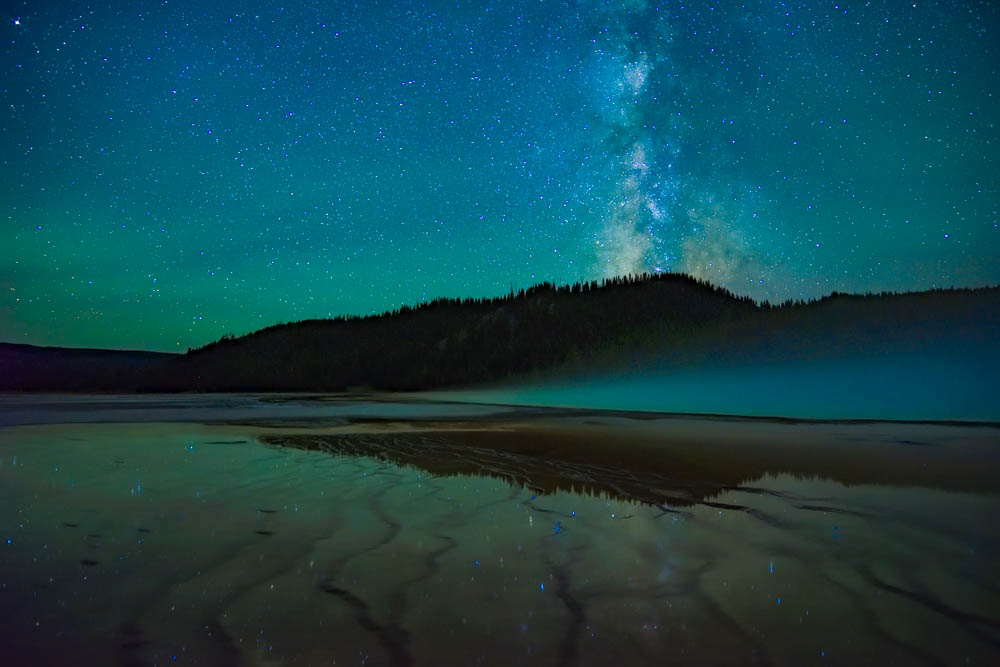
Compare the two images above. The stacked image – and all the source images that went into making it – looks a bit drab. There’s some color there, but it’s dull. After probably 30 seconds or less of editing, I ended up with the spectacular result at right!
Lightroom is my editor of choice, and truth be told, I often start by clicking the Auto button in Develop mode. That often gets me a good start, though for some images it goes horribly awry and I have to do all the adjustments manually.
Whether or not I use Auto, I usually tweak the exposure a bit to give the image the right amount of brightness. I also play with vibrance and/or saturation to bring out colors, and I’m fond of dehaze as a kind of contrast adjustment on steroids that can also help to bring out color.
If your image has a lot of noise, you can try either the normal noise reduction controls, or Lightroom has an AI-powered noise reduction tool that can get good results. Just remember that the more noise reduction you use, the more stars you’ll lose.
Conclusion
There are a lot of words above, and if you’ve stuck with me this long, I hope it was useful for you. However, one thing you should remember: there are no hard rules here. Don’t take everything I’ve said as gospel, as I’m still learning myself. Experiment! Look for interesting compositions, play with exposures and different techniques, and take notes on what you’ve done so you can reproduce it once you capture an image that you really like.
Feel free to ask questions in the comments as well.

